What is an annotative object?
Simply stated, annotative objects have a plotted size value, and the annotative objects change in size (based on the annotation scale) to appear the correct size in paper space. That's it.
There are a few criteria:
- Objects have to be annotative.
- The annotative object needs annotation scales assigned to it, and
- The VP scale needs to equal the annotation scale.
Once these 3 conditions are met, annotative objects will appear at their plotted size in the paper space view port.
Can all objects be annotative?
No, but the following objects can be annotative: text, blocks, dimensions, leaders, and hatches. This means these 5 object types can be placed in Model Space and can appear the same size in different view ports, so long as the annotation scale matched the view port scale.
How do I create Annotative objects?
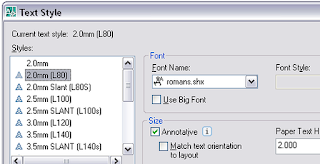
 First, the object needs to be annotative. In the case of text, the easiest way to have annotative text is to check the "annotative" box in the text style. Annotative styles have a little blue triangle-shape icon appear to the left of the style name (like an end view of an engineer’s scale). In the text style we assign a paper text height for each annotative style. Set this to be the plotter (paper space) text height.
Now What?
Once we have annotative objects, we need to assign an annotation scale to them. Annotation scales may be somewhat familiar; it’s the list of scales, some metric, some imperial, some XREF, that appear at the bottom status bar. When you create annotative objects, the current annotation scale is added to it. (Note that since annotation scales only apply to model space objects, the annotation scale bar vanishes when in paper space; the viewport scale is now the viewport/annotation scale.)
To add more annotation scales to objects, select the objects, right-click and choose Annotative Object Scale Add/Delete Scales…
Select the scales you want added, and click OK. The selected scales will appear in the Object Scale List.Use the SCALELISTEDIT command to add, delete, or edit the scales in the list.
The Last Step
Now that we have annotative objects with annotation scales associated to them, the last step is to set the view port scale to the desired annotation scale.
When you set the VP Scale using the scale list, objects with the same annotation scale assigned will appear at the annotative size. Annotative objects without the current annotation scale will not appear.
In the example below, the drawing has 2 objects: a rectangle, and an annotative dimension, both in model space. The dimension style is annotative, and the dimension has 2 annotation scales assigned to it: 1:1000 and 1:2000. Two viewports are created, with the VP Scales set to 1:1000 and 1:2000, as noted in the illustration below. For each view port, the dimension has scaled itself to appear at the desired paper height. Remember, this is only one dimension!
Note: for this to work, the VP Scale must be set to the annotation scale (zooming in and out in a VP will de-sync the VP scale and Anno scale, click the sync button to correct).
There are a few icons in the lower right tray, here's what they do:
There are a few icons in the lower right tray, here's what they do:
The VP Scale in the status bar will show the annotation scales list, so it’s easy to pick the right one.
While I focused on text and dimensions in this post, the same principles apply to blocks, leaders, and hatches: That can be annotative, and will follow the same principles as the examples.
What's you annotative story? Share you experiences!


No comments:
Post a Comment